New Feature Alert: Rotating, Resizing & Expanded Editing Capabilities for Property Measurements
A few years ago we added editing capabilities to our toolset that allow our users to change the dimensions of property measurements after they are made on Go iLawn and Go iPave. Since then, the editing tool has been one of our customers’ favorite and most frequently used tools because it helps our users make their landscaping and paving measurements extremely accurate.
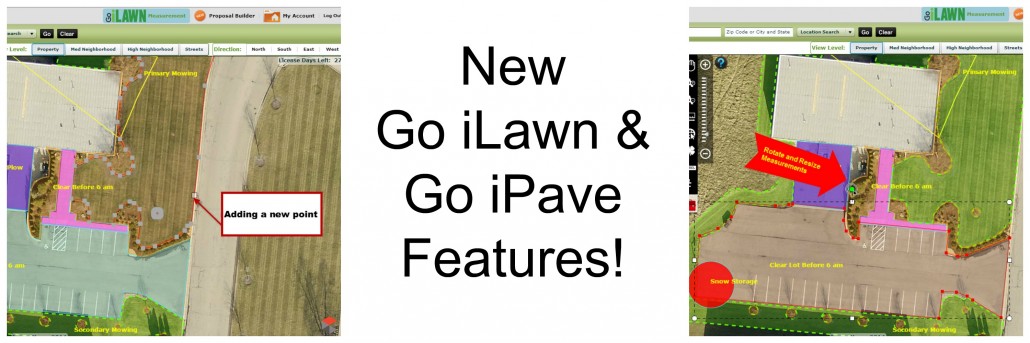
We are excited to announce that we’ve recently updated the editing tool to make it even more helpful and more robust. Now when you edit measurements, you can add points to the measurement result while you’re editing, expanding your abilities to make measurements larger or more precise after creating them.
To use the enhancements to the editing tool, simply:
- Right click on a completed measurement.
- Select edit and you will see your measurement result turn red with gray boxes around the perimeter. (The gray boxes indicate all of the places where you clicked with your mouse to drop points in your measurement when you initially made the measurement.)
- To add a point to a measurement, simply click along the red boundary outline of the measurement and you will see another gray box appear.
- Continue adding as many new points to your measurement and moving them around as you please.
- You can also delete a point on any measurement by following steps one and two, then right click on a point and select ‘delete vertex’.
See the enhancements to Go iLawn and Go iPave’s editing feature in this short video:
Rotate and Resize Property Measurements
Another exciting recent addition to our toolset is a rotate and resize feature. This will allow Go iLawn and Go iPave users to measure property features and objects that are similar in size even faster than before.
This is great for tree rings, parking lot islands, driveways in HOA’s and many other items landscape and pavement maintenance contractors are tasked with measuring.
To Rotate a Measurement:
- Right click on a completed measurement.
- Select Rotate/Resize.
- Hover your mouse over the white square box that has a green dot above it. You will then see a rotate icon appear (a semi circle with an arrow).
- Click down with your mouse and hold while you rotate the measurement to the desired position.
- When finished, let go of the mouse, select stop editing, and the shape will remain where you placed it when rotating it.
To Resize a Measurement:
- Right click on a completed measurement.
- Select Rotate/Resize.
- Hover your mouse over any of the white square boxes (the white circles will not help you resize, only the squares), and you will see black arrows appear.
- Click down and pull your measurement in or out to make the measurement size larger or smaller.
- When finished, select stop editing and your shape will be resized accordingly.
Watch this short video on rotating and resizing measurements:
Watch this short video showing an example of when the rotate and resize tool can be particularly helpful:
Give these features a try and let us know what you think!


Leave a Reply
Want to join the discussion?Feel free to contribute!