Tool Tip – Controlling Your Groups
Every drawing you make in New Go iLawn / Go iPave goes into a Group.
Why Are Groups Important?
Groups provide an important way to define what you’re measuring on your job-site and why it is important. Starting out, our default groups let you separate the different types of surface you’re measuring: Turf, Mulch, Asphalt, Concrete, etc…
This basic use of Groups is OK, but you can use groups to show something more meaningful. Customizing your groups in Go iLawn/Go iPave allows you to categorize every part of the job for how YOU do business. Some ideas include using groups to separate:
- The piece of equipment you’ll use to service an area. Example = Mowing big areas with a 60″ and smaller ones with a 21″.
- The days of a multi-day job. Example = Giving your retailer customer a map for completing a 3-day seal-coat of their parking areas.
- Phases of multi-year/multi-season service quotes. Example = Creating a 5-year maintenance plan for an industrial campus.
So before you start making your first Area, Distance, or Count in Go iLawn/Go iPave, make sure you’ve defined the right groups for the job and the right groups for your business. Once you’ve decided what your groups should be, Go iLawn/Go iPave gives you lots of flexibility for controlling them. Here’s How:
Editing Your Groups
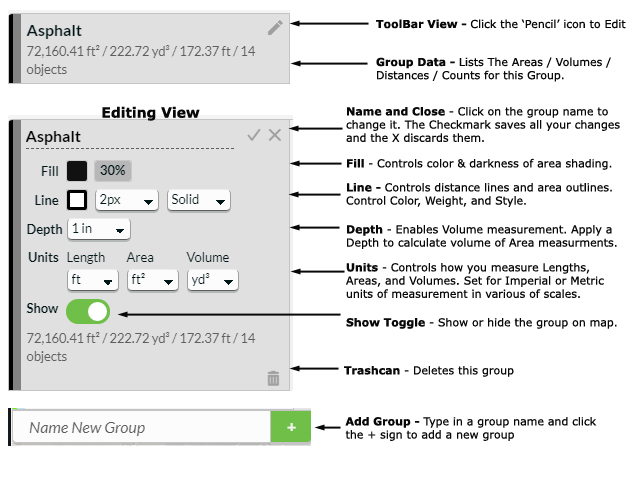
On the left side of your Project’s “Map” screen, we list your current groups. Next to each group name is a “Pencil” icon you can click to open that group for editing. This gives you access to the Editing View, which controls the following group attributes (See the diagram above):
- Name – Give your group a meaningful name
- Fill – Change the color and darkness of area shading
- Line – Change the color, weight, and style of lines in the group
- Depth – Allows you to set a depth to calculate the volume of material to cover an area (X) inches deep
- Units – You can select the units of measure for length, area, and volume in the group
- Show – Toggles THIS group between ‘hidden’ and ‘visible’ on the map
- Trashcan – This icon at bottom right lets you delete this group from the project.
Adding New Groups
Just below the Groups list, you also have the option to add a new group. Just type in a group name and click the + sign to add a new one, then edit this group to meet your needs.
Default Groups
Using the instructions above, you can edit the groups in your project. But what if you want to standardize group settings for all your projects? We’ve got that covered too. Here’s how to do it.
- From any screen in your Go iLawn/Go iPave software, click your username (Your email address) at upper Right.
- Select the option “My Account”
- At the bottom of the next screen, under “Project Settings”, we list your Default Groups.
- Using the same controls as above, you can edit these default groups to give them the names, colors and attributes you want.
- These updated Default Groups will now be applied to any New Project you make.
Pro Tip:
Check what group you’re in, every time, BEFORE you start measuring to save the trouble of moving drawings from group to group later.
How does your company use groups?
Do you use your groups for something different? Let us know in the comments.
Thanks,


Leave a Reply
Want to join the discussion?Feel free to contribute!